


The Future of Coaching : Building an Intelligent RAG Agent
AI Agent 003

Imagine an AI Coach that goes beyond simply retrieving information. Instead, it actively analyzes, adapts, and personalizes its guidance in real-time. This is not a system that just delivers responses—it intelligently searches for and processes the most relevant answers based on the user’s query, context, and intent—it’s possible today using an Agentic Framework powered by phidata and Qdrant.
Traditional AI models struggle with static knowledge limitations. They provide responses based on pre-trained data but lack the ability to pull in fresh, dynamic insights from external sources. This is where Retrieval-Augmented Generation (RAG) transforms the game. By enabling AI systems to fetch real-time, domain-specific data, RAG ensures responses remain accurate, contextually relevant, and always up-to-date.
Now, add agentic intelligence to this equation—an architecture where AI systems autonomously plan, decide, and take action based on user queries. The result? A next-level AI Coach that can guide, mentor, and provide tailored learning experiences in a way that static chatbots never could.
To build such a system, we need the right tools. Enter phidata and Qdrant.
phidata streamlines the entire AI workflow—data ingestion, preprocessing, and integration—ensuring that the AI agent operates on clean, structured, and reliable datasets.
Qdrant, a powerful vector database, provides lightning-fast similarity searches, allowing the AI agent to retrieve the most relevant pieces of knowledge based on semantic meaning rather than keyword matching.
Together, they form the core engine of an intelligent RAG-powered AI Coach, capable of real-time knowledge retrieval, adaptive reasoning, and self-improvement. Whether you're developing an AI-driven corporate mentor, a personalized learning assistant, or an executive decision-making advisor.
In this guide, I will take you through the process of building an Agentic RAG AI Coach step by step. From setting up the AI Agent to integrating PhiData and Qdrant, we'll cover all the essential components. By the end of this guide, you’ll have a powerful AI Coach at your disposal, ready to resolve user queries by retrieving real-time data from a dynamic, knowledge-rich system. Get ready to create an intelligent, responsive coach that adapts to user needs and delivers accurate, contextually relevant answers with ease
Are you ready to build the future of AI-driven coaching? Let’s dive in.
Step-by-Step Guide to Building an Agentic RAG AI Coach
We’re building an AI agent that can answer user questions within a specific domain, and to achieve this, we’ll train the agent using transcription files from YouTube videos.
These transcriptions will serve as a valuable source of domain-specific knowledge, enabling the AI to pull relevant information and provide accurate, context-aware responses to queries.
By leveraging these transcriptions, we ensure that the agent is equipped with expert-level insights, tailored specifically to the subject matter of the videos. This step will lay the foundation for a highly effective AI coach that can provide real-time, intelligent answers to users based on the rich content it has been trained on.
Step 1: Setup Virtual Env
Execute the following code to set up our virtual environment. This will create an isolated environment where all the necessary dependencies and packages can be installed without interfering with your system’s global setup.
Setting up a virtual environment is crucial for managing project-specific dependencies, ensuring compatibility, and maintaining a clean workspace. By running this code, you’ll be ready to install and manage all the required libraries and tools needed for building and deploying your AI agent.
python3 -m venv ~/.venvs/aicoach
source ~/.venvs/aicoach/bin/activate
Step 2: Install Dependencies
Before we begin coding, we need to install the necessary packages to ensure that our environment is properly set up. To do this, simply execute the following command.
pip install -U phidataThis will install all the dependencies required for building and running the AI agent, including libraries for PhiData. Once the packages are installed, you'll be ready to dive into the development process.
Qdrant is a powerful vector search engine that helps in storing and retrieving high-dimensional data efficiently. To setup Qdrant locally, here are the steps you can follow - Setup Qdrant
Step 3: Download the youtube video transcription
I have downloaded the transcripts of several videos from the YouTube channel LiamOttley. Liam provides valuable insights on AI automation, marketing, and a variety of other topics that are highly relevant in today’s tech landscape.
To proceed with this process, you can easily download YouTube video transcriptions from Tactiq.io. After downloading, simply place the transcription files into a folder named "transcripts" to keep them organized and ready for use. This will ensure the agent has access to all the necessary content for training.
Step 4: Create VectorDB for documents ingestion.
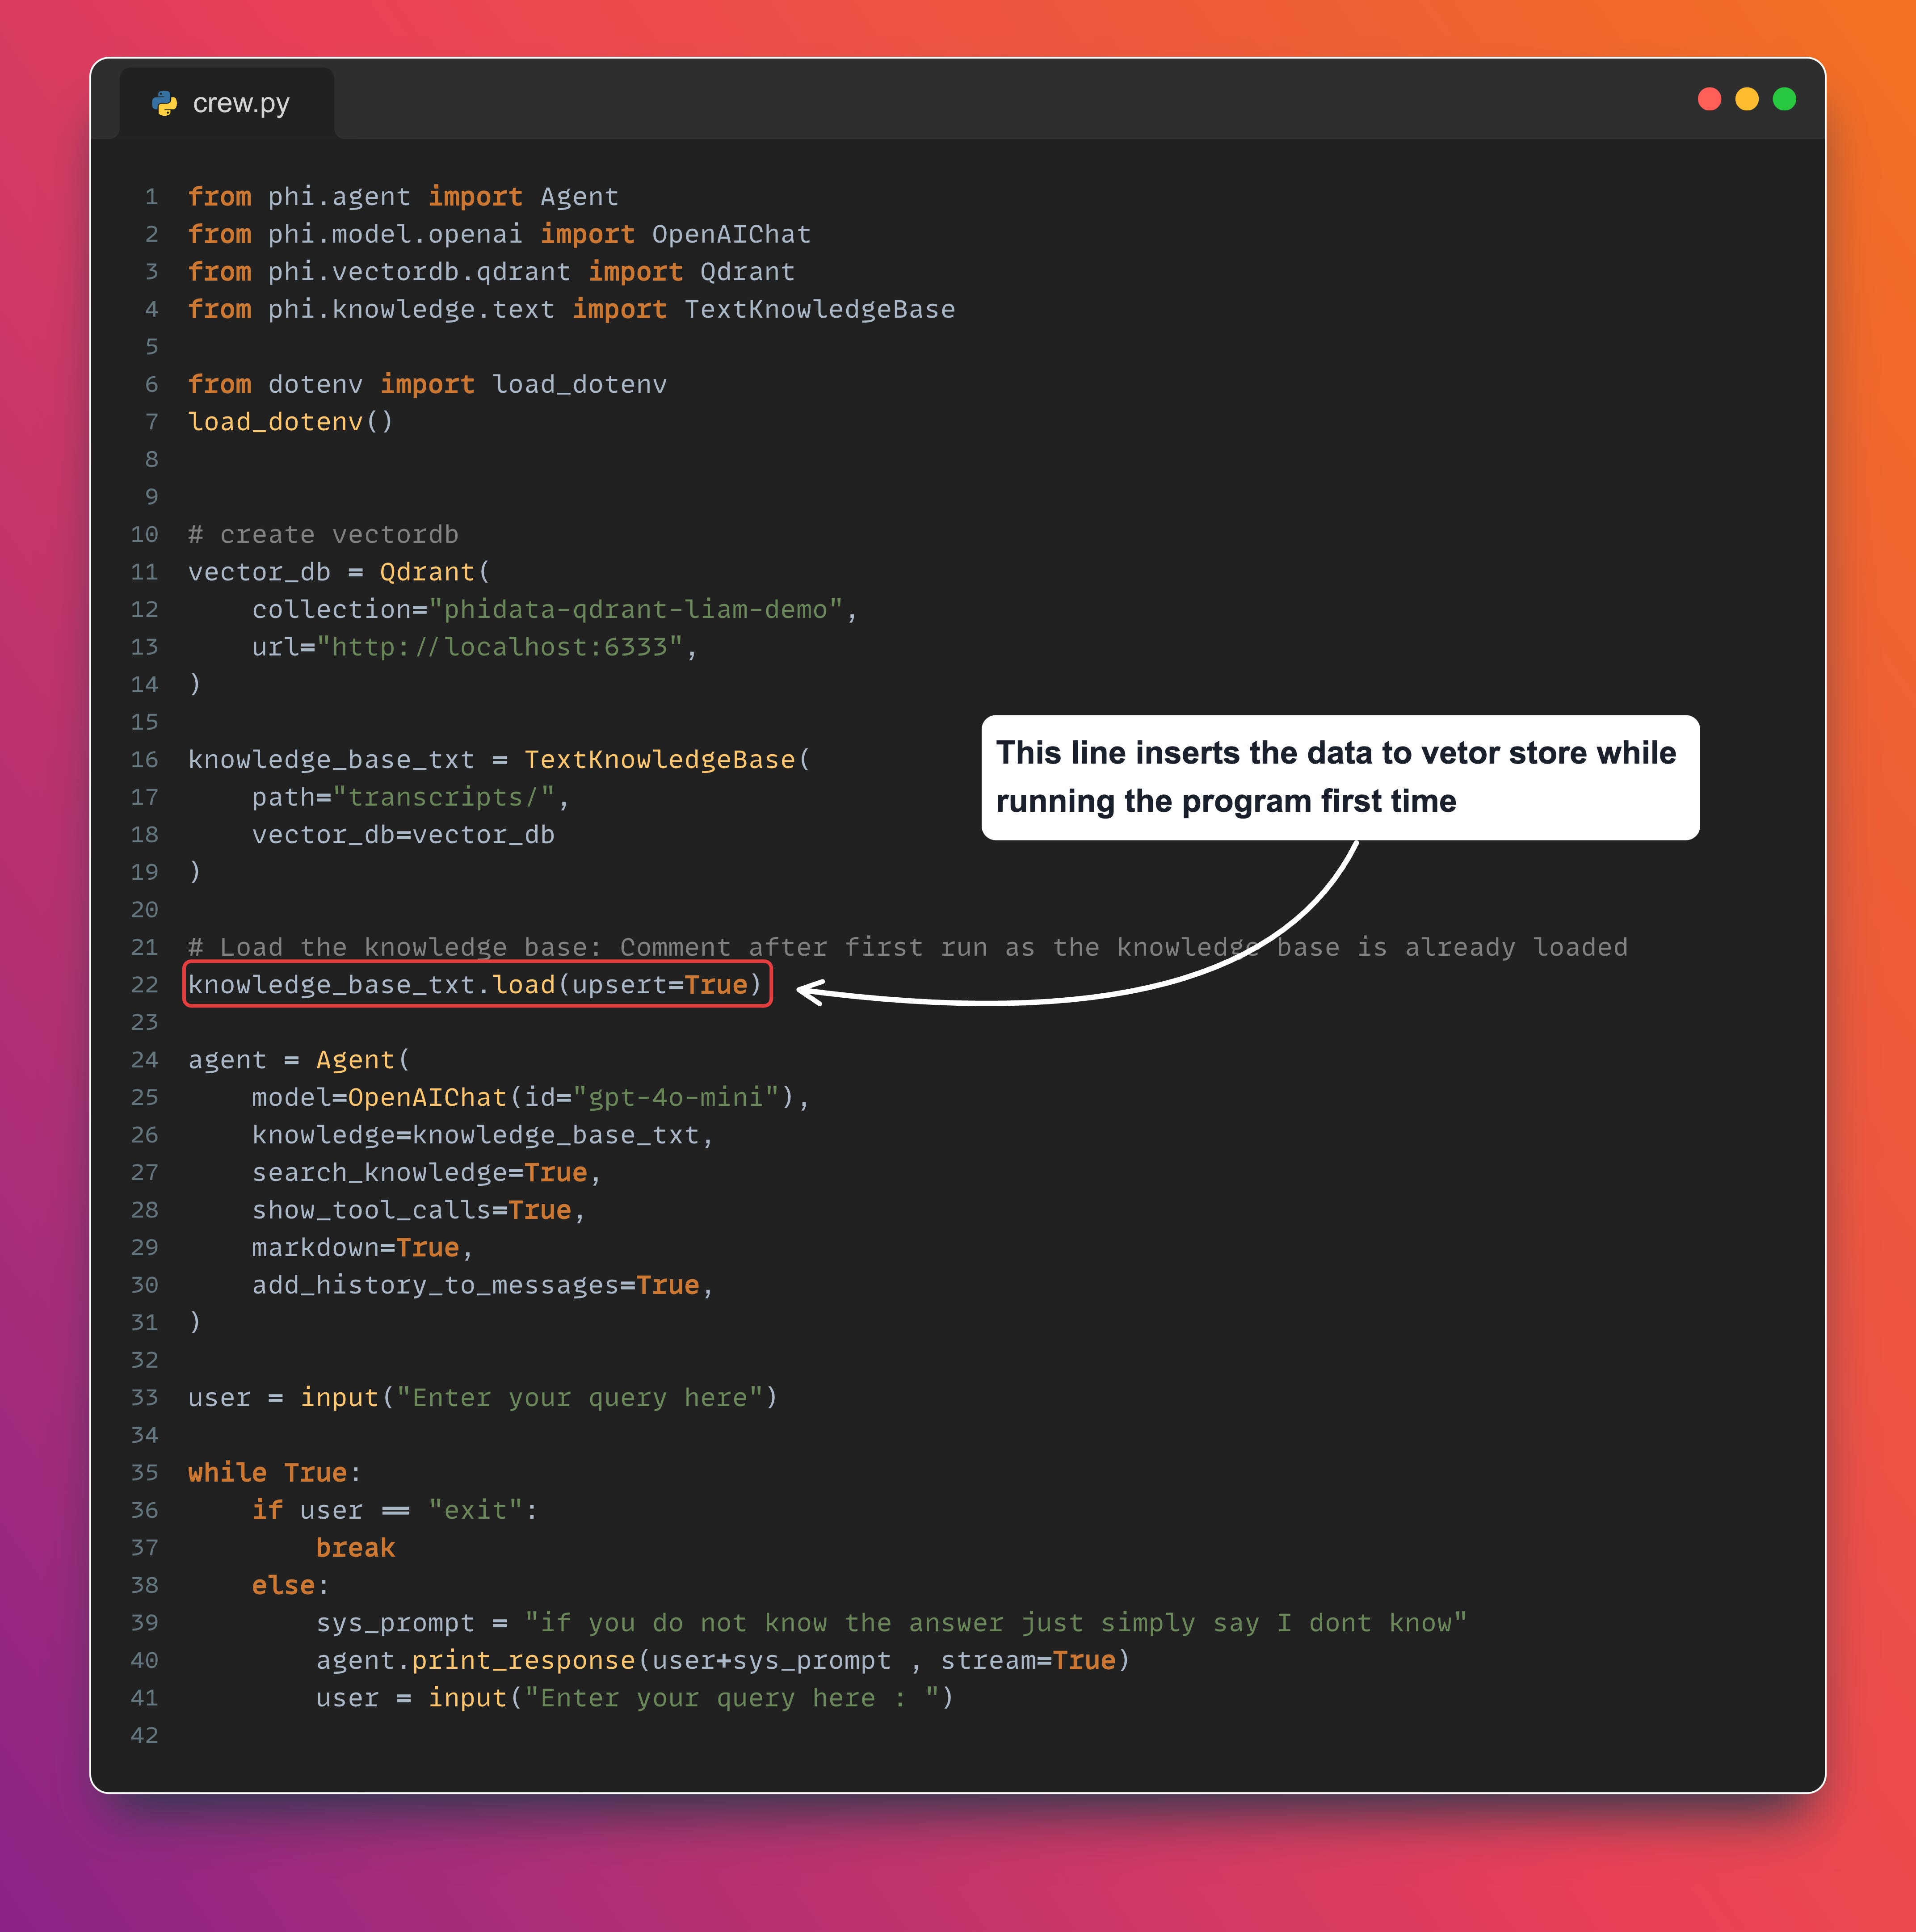
We have imported the Qdrant implementation from phidata and created an instance to specify details, such as the name of the collection we want to create and the URL where Qdrant is running. This instance will help establish the connection to our Qdrant database, enabling us to store and retrieve vectorized info efficiently.

Step 5: Create a Knowledge Base for our AI Agent.
The next step in enhancing the intelligence of our AI Agent involves creating a knowledge base. This knowledge base will serve as the foundation for the agent to reference whenever it receives a question from the user. To achieve this, we will use the TexKnowledgeBase from phidata to build repository of information that the agent can query to provide accurate, domain-specific answers.
This process makes sure that the agent is not only well-informed but also capable of offering relevant and accurate responses to users in real-time.

Step 6: Create our AI Agent.
Now that our knowledge base is ready, the next step is to create an AI agent that can consume and interact with it. Creating an agent in phidata is straightforward. Below is the code to set up the agent and connect it to the knowledge base:
agent = Agent(
    model=OpenAIChat(id="gpt-4o-mini"),
    knowledge=knowledge_base_txt,
    search_knowledge=True,
    show_tool_calls=True,
    markdown=True,
    add_history_to_messages=True,
)
In the above code, we pass the previously created Knowledge Base to the agent. This allows the agent to use the knowledge base whenever it receives a query, so that it provides relevant and contextually accurate answers based on the information stored.
We have used the model ‘gpt-4o-mini’ to power the agent's responses. Additionally, it's crucial to note that we store the OPENAI_API_KEY in a .env file to securely manage API keys. You’ll need to create this file and place it at the root of your project directory. The .env file will look something like this,
OPENAI_API_KEY=your_openai_api_key_hereStep 6: Final touch - setup system prompt.
To configure a system prompt for our agent, we need to define the instructions that guide the agent's behavior. This system prompt will help the agent understand the context and provide more relevant and tailored responses. Below is the code to configure the system prompt for our agent:
user = input("Enter your query here")

while True:
    if user == "exit":
        break
    else:
        sys_prompt = "if you do not know the answer just simply say I dont know"
        agent.print_response(user+sys_prompt , stream=True)
        user = input("Enter your query here : ")
We will keep on running the loop until user enters “exit“ as the command
Let’s look at the end to end code now,
Step 6: Execute the Agent.
To execute the agent, simply run the following command.
python main.pyThis will initiate the AI agent, allowing it to start processing queries and providing intelligent responses based on the knowledge base you’ve set up. Make sure all the necessary configurations and dependencies are in place before executing this command. Once done, your agent will be ready to interact with users and deliver answers in real-time and you should see something like below,
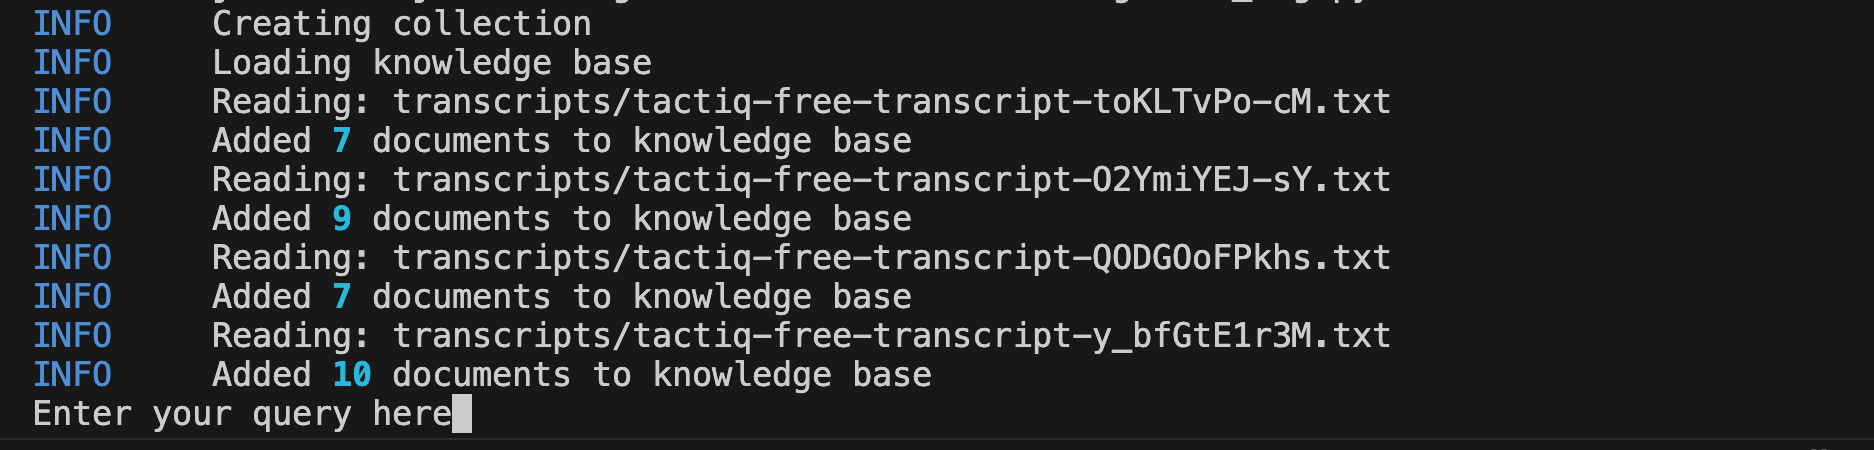
When executing the Python file for the first time, the system will ingest and add all the documents (transcriptions, in this case) into the knowledge base, preparing it for use by the agent. This process ensures that the knowledge base is populated with relevant information, which the AI coach will use to provide accurate and context-aware responses.
Now lets ask the question to our AI Coach.

And there you have it! We asked the AI Coach a question about Liam, and the response perfectly reflects the core of what Liam is all about—AI automation, marketing, and more. This shows that the agent is successfully pulling relevant information from the knowledge base and delivering accurate answers.
Congratulations on a job well done! You've successfully set up an intelligent AI coach capable of responding to user queries based on the knowledge it has ingested. This is a significant step forward in building a powerful, domain-specific AI system.
Here is my git repo where all code can be found - github link
In case you prefer a video of the above explanation, go through my video below. Don’t forget to hit the like button and subscribe if you find the video useful—your support helps me create more valuable content like this!
And that’s a wrap for this edition! Stay tuned for more updates in the next newsletter. Until then, take care and stay curious!
Enjoyed this article. Looking forward to learning more.